7. AI Playbooks and Knowledge Base
This chapter is for the people who set up AI checking — usually RA, with R&D supplying product data. Once a playbook is set up, anyone can run it on a proof (chapter 8).
7.1 What is a playbook
A playbook is a saved set of AI agents plus the reference files they use. You build a playbook once, then run it on every proof.
- An agent is one AI checker with a defined job. Example: Spelling & Grammar, or United States regulatory compliance.
- The Knowledge Base holds your reference files: brand guidelines, claims rules, and product specifications. Agents read these files while checking.
A typical CPG setup: one playbook per market, or one playbook per product category. Example: VitaBoost — US Retail with the United States agent, the universal quality agents, and the VitaBoost product specifications.
7.2 The AI Playbooks screen
- Select "AI Playbooks" in the sidebar.
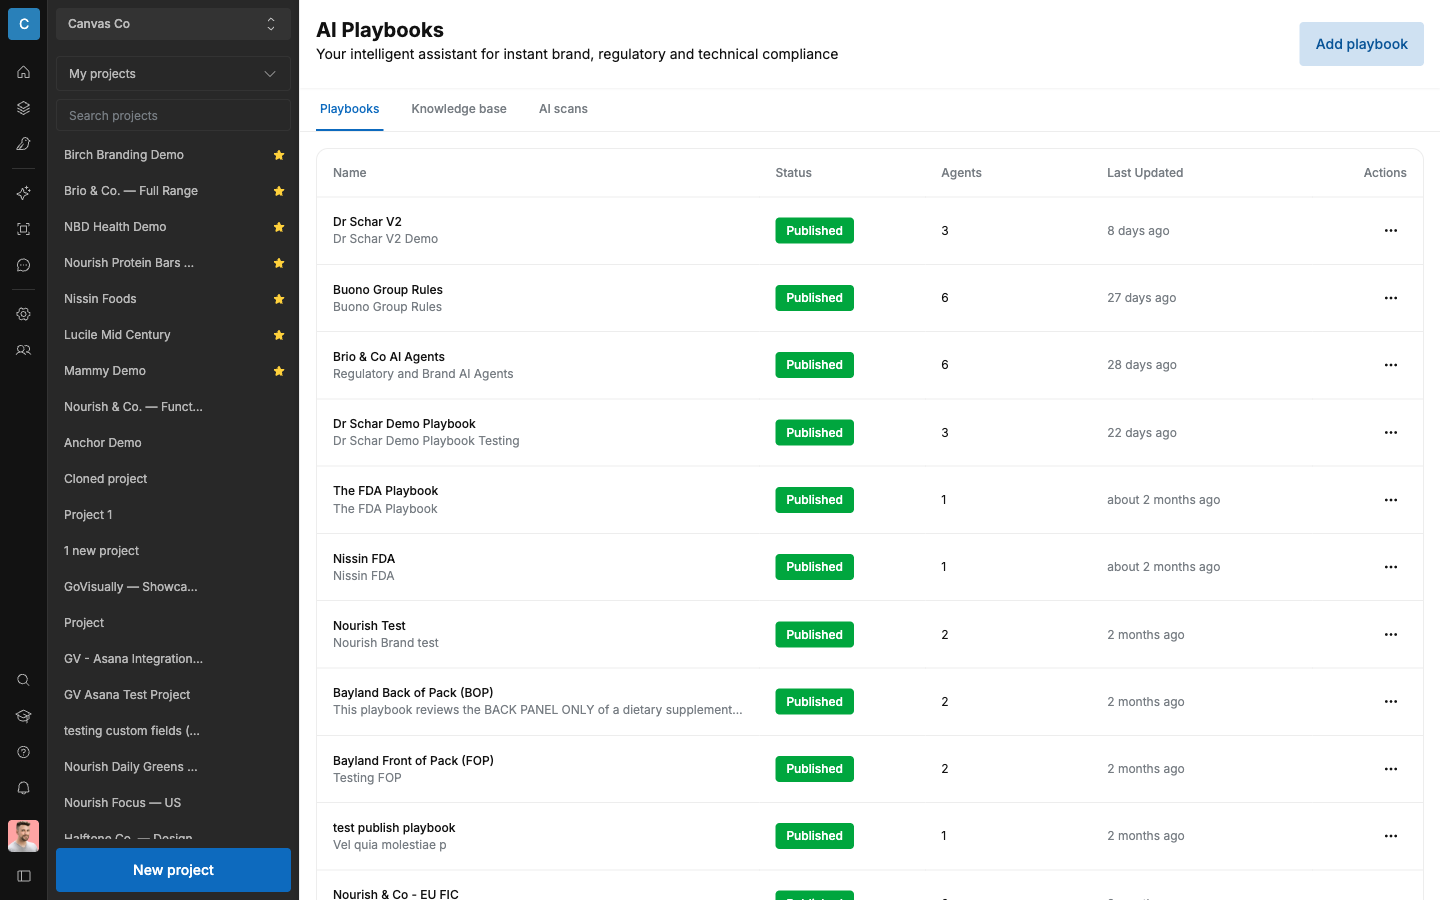
- The screen has three tabs: "Playbooks", "Knowledge base", and "AI scans".
- The "Playbooks" tab lists every playbook, with columns "Name", "Status", "Agents", "Last Updated", "Actions".
7.3 Create a playbook
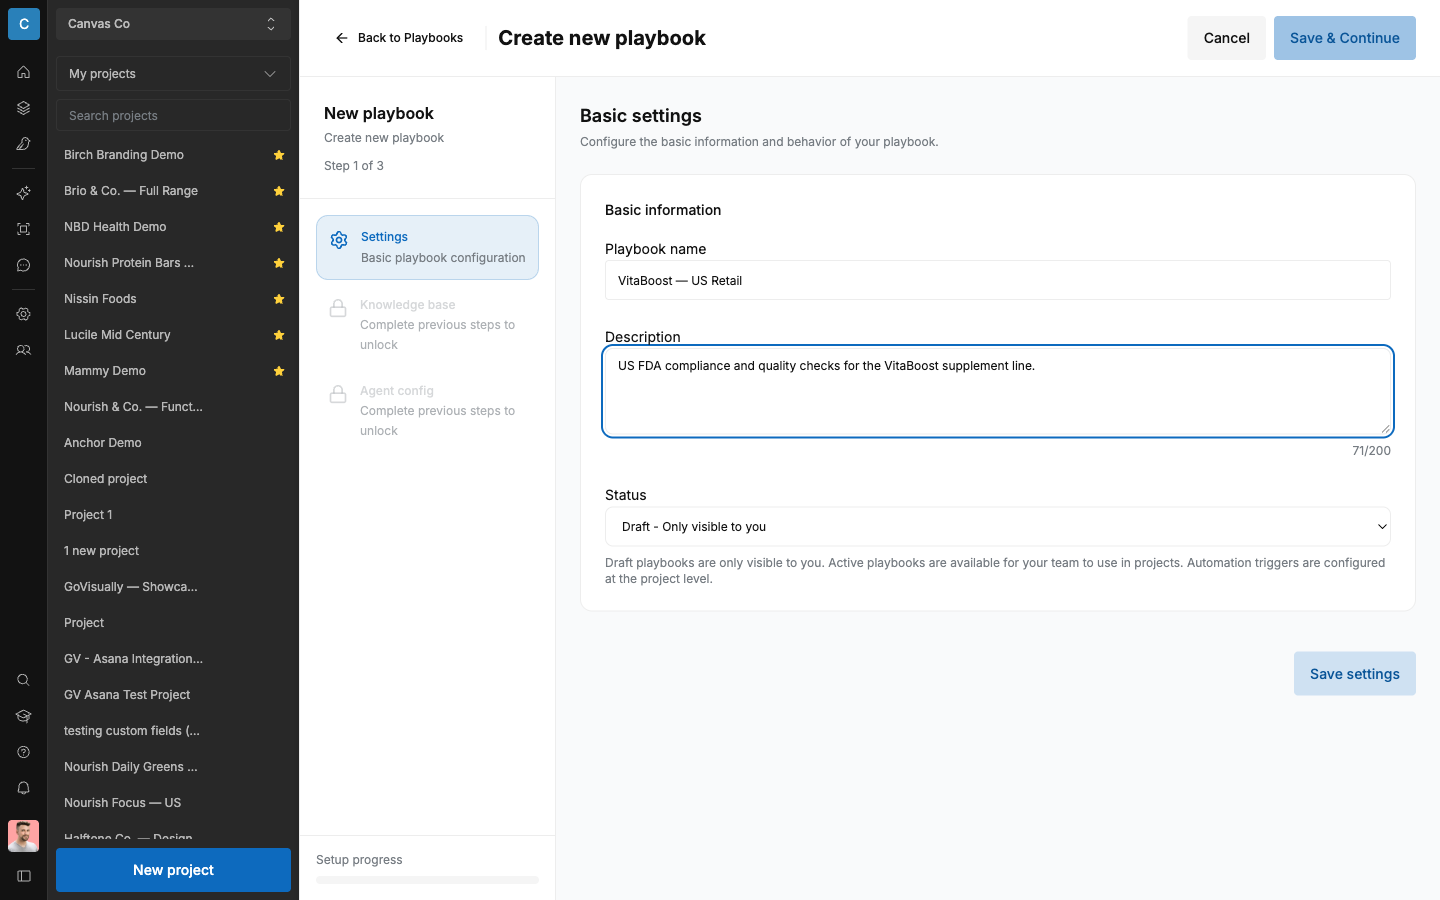
A new playbook is set up in three steps. The screen shows "Step {n} of 3". Later steps stay locked until you finish "Settings" ("Complete previous steps to unlock").
The three configuration tabs:
| Tab | Purpose (as shown) |
|---|---|
| "Settings" | "Basic playbook configuration" |
| "Knowledge base" | "Upload and manage reference files" |
| "Agent config" | "Configure AI agents and their settings" |
- On the "Playbooks" tab, select "Add playbook".
- On "Settings", give the playbook a name and description. Both are required. Set its "Status": "Draft - Only visible to you" while you build it, or an active status once your team should be able to use it in projects.
- Continue to "Knowledge base" (section 7.4).
- Continue to "Agent config" (section 7.5).
7.4 The Knowledge Base
Knowledge Base files live in two places:
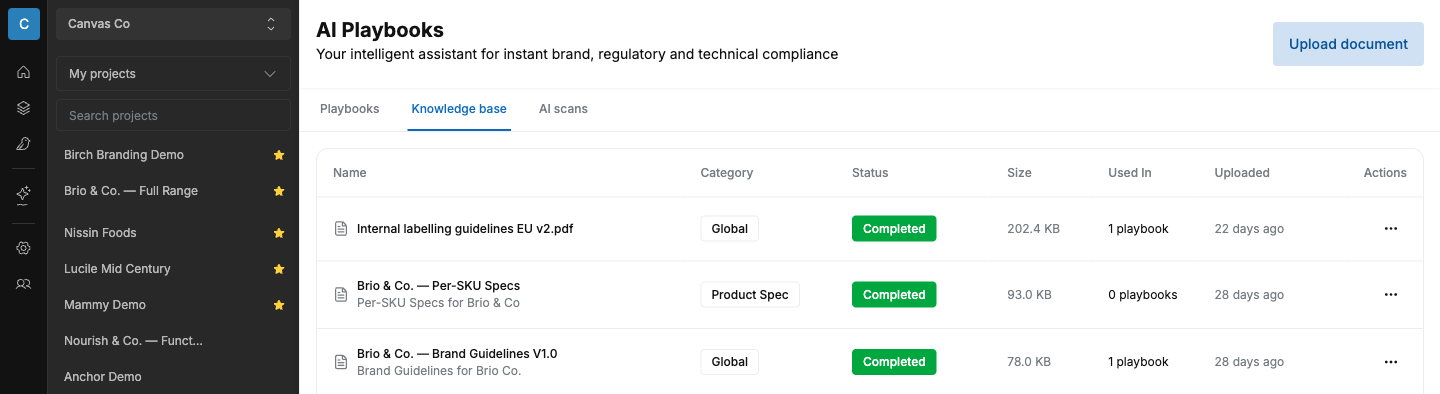
- The central library — the "Knowledge base" tab on the main AI Playbooks screen. Every file your workspace has ever uploaded lives here, in one table for "Upload document".
- A playbook's own attach step — inside a playbook, the "Knowledge base" step lets you attach up to 3 existing files to that playbook, using the "Select knowledge base item..." picker, or "Upload new" to add one on the spot. This step is optional — you can skip it and add files later.
The central library table shows columns: "Name", "Category", "Status", "Size", "Used In", "Uploaded", "Actions".
Every file has a category:
| Category | Use for | Examples |
|---|---|---|
| "Global" | Rules that apply to every product. | Brand guidelines. Claims policy. Internal labeling checklist. Regulatory reference sheets. |
| "Product Spec" | Data for one product. | The SKU's ingredient list. Nutrition data. Certifications. |
When you upload a product specification, GoVisually extracts its content into structured groups: Nutritional Information, Ingredients And Allergens, Claims And Certifications, Storage And Handling, Quality Specifications, Company Information. Open a Product Spec file to review the extracted data.
Division of work that works well:
- RA owns "Global" files: claims rules, market checklists.
- R&D owns "Product Spec" files: one per SKU, updated when the formula changes.
- Review extracted Product Spec data after every upload. The AI checks against this data, so it must be correct.
7.5 Agent config
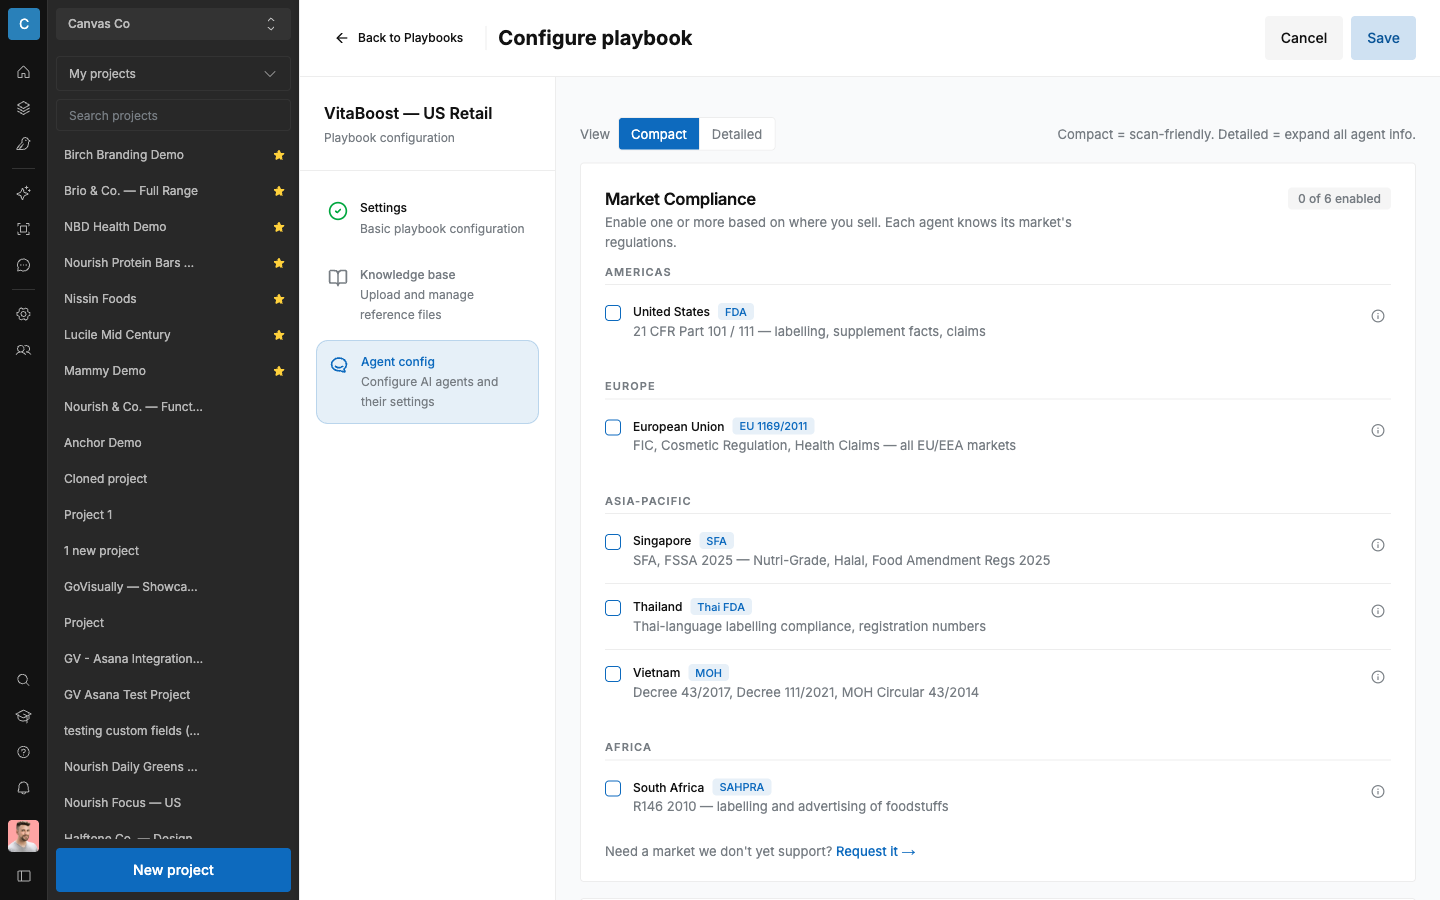
On the "Agent config" tab, choose which agents run in this playbook. Switch between "Compact" and "Detailed" view — "Compact = scan-friendly. Detailed = expand all agent info." Agents are grouped in three categories:
"Market Compliance"
Regulation checks for one market. Grouped by region: "Americas", "Europe", "Asia-Pacific", "Africa". Available markets:
| Market | Checks against |
|---|---|
| United States | FDA — 21 CFR Part 101 / 111: labelling, supplement facts, claims |
| European Union | EU 1169/2011 (FIC), Cosmetic Regulation, Health Claims — all EU/EEA markets |
| Thailand | Thai FDA — Thai-language labelling compliance, registration numbers |
| Singapore | SFA, FSSA 2025 — Nutri-Grade, Halal, Food Amendment Regulations 2025 |
| South Africa | R146 2010 — labelling and advertising of foodstuffs |
| Vietnam | Decree 43/2017, Decree 111/2021, MOH Circular 43/2014 |
If your market is not listed, use the request option on the agent config screen to ask for it.
"Universal Quality Checks"
Checks that apply to every label, in any market:
| Agent | Checks |
|---|---|
| Spelling & Grammar | Typos, grammar, brand-specific terminology violations |
| Barcode & QR Code | UPC / EAN / GTIN / QR — presence, format, checksum, quality |
| Claims Validator | Disease, structure-function, nutrient-content, health, and comparative claims |
| Visual Elements | Logos, certification marks, warning symbols, competitor marks |
"Your Custom Rules"
One agent that checks whatever you teach it. It builds a checklist from your "Global" Knowledge Base files and audits the proof against that checklist.
This agent needs Knowledge Base files. Without them, it finds nothing. Write rules as clear, single statements. Example: "The allergen statement must appear directly below the ingredient list, in bold."
7.6 Scope instructions for multi-panel packaging
Many CPG products are reviewed as separate proofs per panel. Example: a pouch has a front panel and a back panel, uploaded as two proofs. This is good for version control and panel-level commenting. But an agent reviews one proof at a time. It cannot see the other panel. Without scoping, it flags the front panel for "missing Supplement Facts" — an element that correctly lives on the back panel.
The fix is a set of scoped playbooks. Set it up once per packaging format:
- Use a filename convention that marks the panel. Example:
{SKU}-01for front panels,{SKU}-02for back panels. - Create one playbook per panel type. Example: Pouch — Front Panel and Pouch — Back Panel.
- In each playbook's "Settings" description, write a scope contract. State which panel this playbook reviews. List the elements the agent must NOT flag as missing, because they live on the other panel. List the elements that ARE in scope.
- Add per-agent guidance with the same scope rule for the market compliance agent and the Claims Validator.
- Create custom fields to pair the panels: SKU Code, Panel Type, Sister Panel (see chapter 11).
- Add an approval checklist for cross-panel consistency: net quantity matches, claims on the front are substantiated on the back, allergen statements agree (see chapter 4). The AI reviews one file at a time, so cross-panel checks are a human step.
Example scope contract for a front-panel playbook (dietary supplement pouch, US market):
This playbook reviews the FRONT PANEL ONLY of a dietary supplement
pouch. The back panel is reviewed as a separate proof, paired by SKU
code. Proofs ending in -01 are front panels; -02 are back panels.

DO NOT FLAG AS MISSING — these elements live on the back panel:
- Supplement Facts panel
- Ingredients list
- Allergen declaration
- FDA structure-function disclaimer
- Distributor / manufacturer address

ONLY FLAG findings for elements expected on a front panel:
- Statement of identity
- Net quantity of contents (when shown on front)
- Marketing and structure-function claims
- Certification logo presence and correct use
When you run the playbooks, pick the playbook that matches the proof's panel. The result: no false positives for elements that live on the other panel, and an auditable human checklist for the checks that span panels.
7.7 Reports
A playbook also has a reports view of its past runs.